Inside PC Health Check: Reversing Compatibility Checks - Part 1

Introduction
I usually find myself getting bored pretty quickly by most of the stuff, but there is one thing that for some odd reason I can’t get enough of and always want to do and learn more about, and that is reverse engineering.
As I have a hard disk that is full of virtual machines that I use (and forget about), I had one older Windows 10 machine that had some random stuff on it that I was testing, and on the desktop I found an application called PC Health Check. If you don’t remember, this application was developed by Microsoft before Windows 11 was out to test your PC’s compatibility so once Windows 11 is out you can safely upgrade.
“How does Microsoft go by retrieving such information from my computer?” — was the question I asked myself upon pressing the striking blue button that says “Check now”.
Without further ado, let’s reverse this thingy :)
Reversing The Application
Before reversing I want to point out that I simplified some of the decompiled code in Ghidra by changing variable names and setting symbolic constants. No major changes are made but it is to save time on explaining stuff and renaming variables mid-writing, although debugger was used in most of the times.
Understanding the application
The blue button that checks for all the requirements is the first thing that can be seen upon opening the application.

Once pressed it opens up a small dialog with the information such as which checks passed and which requirements are missing for your long awaited Windows 11 upgrade (right?).
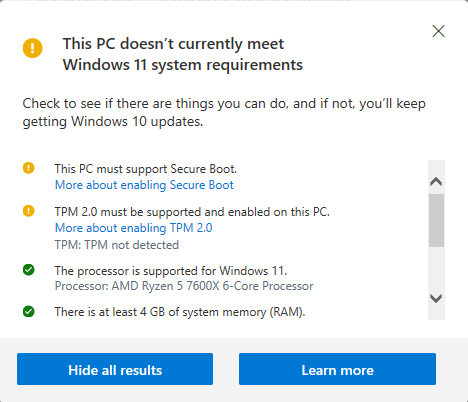
Looking through the dialog, there seem to be 6 checks performed in the total: Secure Boot, TPM 2.0, Processor support, RAM size, System disk size, and Processor cores number.
Awesome, checks seem to be quite fun, so let’s keep on going and find more about how the application was built and it’s architecture.
File & Architecture
Looking at the file location of the file, we can see that it belongs to the following system path:
1
C:\Users\username\AppData\Local\PCHealthCheck\PCHealthCheck.exe
Let’s open it up using Detect It Easy (https://github.com/horsicq/Detect-It-Easy) so we can inspect the application in greater detail.
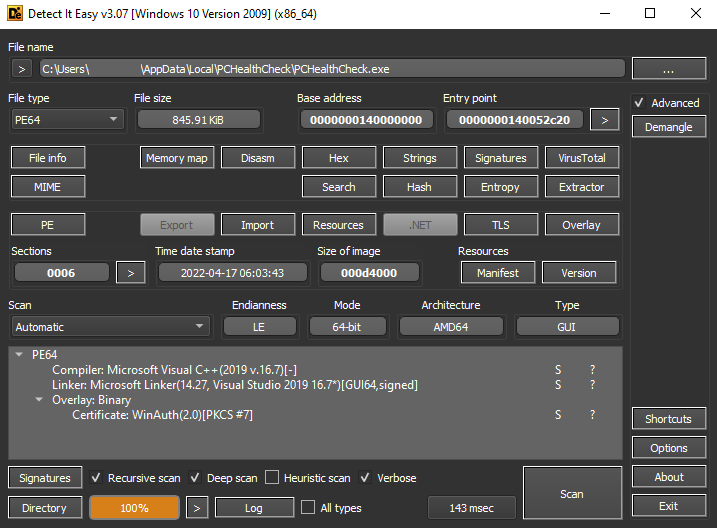
We can see that it is a 64-bit application compiled with Microsoft Visual C++ compiler. Knowing this will help us easily prepare ourselves to things such as calling conventions, win32 API, structures, etc.
Finding Functions
One super simple way I like to search for functions I want, if the applications is not packed or obfuscated in any way, is to search for strings associated with the corresponding functions. Let’s open the application in the debugger such as x64dbg (https://x64dbg.com/) and search for functions.
By default, x64dbg will first pause on the System breakpoint and pause the application immediately. This is not important for now, so you can just Run (F9) the application until it is in Running state. This will run the application under the debugger and load the pchealthcheck.exe module.
To search for the strings for the currently opened module in disassembly pane you select Right click > Search for > Current Module > String references. This will open the references pane where we can see all the strings in the current module and even search for them.
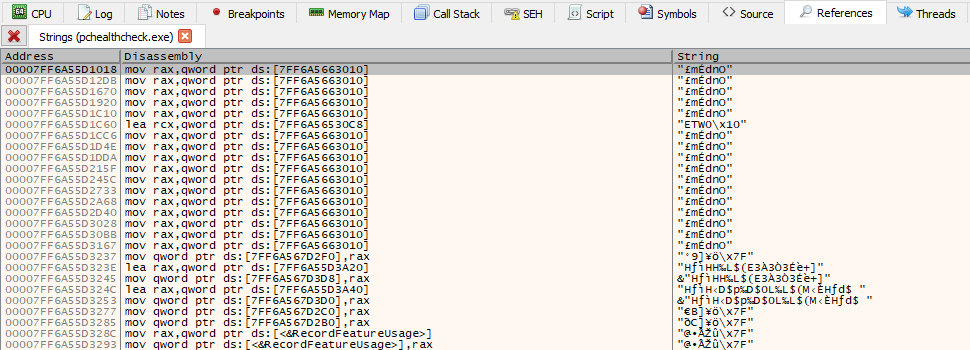
One of the first requirements that I was missing on my VM is that the Secure Boot was disabled. I will use that as a starting point and try and find that function. Let’s search in the strings for something related.
The only thing I was able to find closely related to the Secure Boot check was the following string and it’s location.
1
2
3
Address=00007FF6A5616841
Disassembly=lea rax,qword ptr ds:[7FF6A56323E0]
String=L"UEFI check failed, need machine capable of SecureBoot"
Following this string I end up in the following code section.

Alright, my VM is capable of having Secure Boot enabled, but it’s not enabled, so this message I assume immediately will never be displayed. Let’s check what is called before this by looking at the code above.

Scrolling upwards I see something related to TPM. This makes sense as all these checks are being performed by one button (blue button at the start), so it would make sense that all these checks are possibly all in one place. Let’s check more above.

Now we see something related to processors… Cool, so my guess is that these functions are all next to each other in the code. Let’s try and set a breakpoint on the GetActiveProcessorCount() function in the place where we found code for processor’s count above.

Thinking logically, these functions are called every time we press the “Check now” button, so our breakpoint should be hit once pressed.

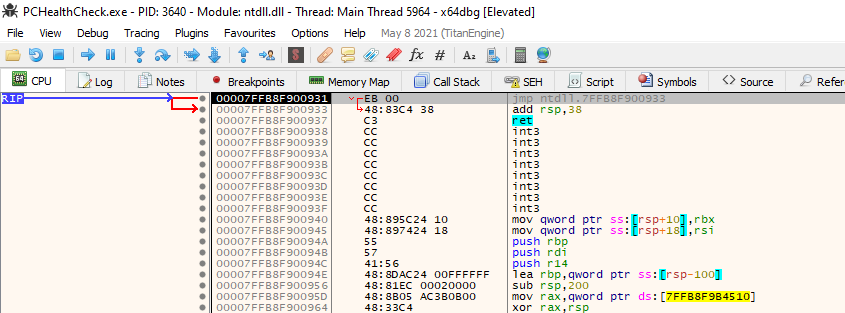
Awesome, our Instruction Pointer (RIP) lands exactly on our breakpoint. What I am interested is what is calling this function? We can find this out by returning from the function and checking the call instruction before.
To hit the return instruction of the current function we can press the Execute till return (CTRL+F9). Once hit, we step over (F8) and we should land at the instruction next to the call instruction that called the function responsible for the processor count.

So instruction call pchealthcheck.7FF6A561651C is responsible for handling the processor count check most likely.
But pause for a minute! What else do we have here?? Seems like we have 6 function calls. We know that we also have 6 checks that are performed which we found at the start.
So, we most likely have our functions we need. One more thing, I have no clue which one is which, so you will need to check them out lightly by inspecting which Win32 API call they are making and check strings. For the sake of this blog not being super long I will check them by myself and label correctly.

Reversing System Checks
With functions labeled, we can start the fun part and inspect how all these checks are performed by Microsoft and potentially learn something new.
RAM Size Check
To get the general idea of how the workflow of this function goes, we can inspect the decompiled code in Ghidra (https://ghidra-sre.org/), where we see the following code:
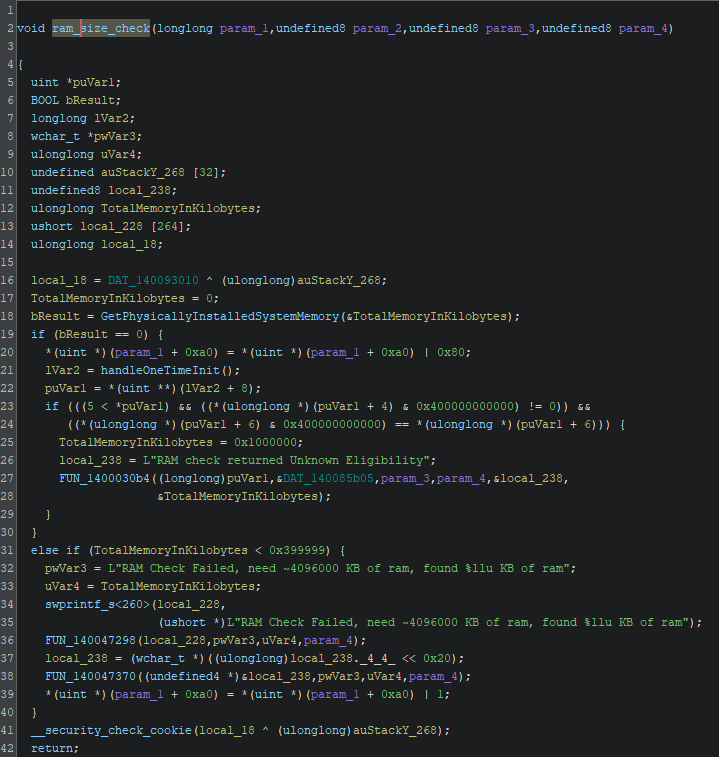
A lot of the stuff is happening in the function, but let’s go over step by step and see what it important and what not.
First thing that function performs is call GetPhysicallyInstalledSystemMemory() function. This WinAPI function will retrieve the amount of RAM that is physically installed on the computer and store the result in kilobytes in the TotalMemoryInKilobytes variable. Let’s check this in the debugger.

We see that TotalMemoryInKilobytes variable is actually the memory location from [rsp+38]. That memory location is loaded into RCX (where first function argument is loaded in x64 assembly). So once we step over that function it will return the TRUE or FALSE, and return the RAM size amount in the [rsp+38].

Soooo, function executed but our RAM size is 0? How is that possible? Unfortunately, as I am doing all of this inside a virtualized environment, the function is not able to retrieve the physical RAM amount.
Funny enough, we still pass the check for RAM size because the check for the size (TotalMemoryInKilobytes < 0x399999) isn’t entered at all because GetPhysicallyInstalledSystemMemory() returns NULL (0).

Before that there is a check after the function I labeled handleOneTimeInit(). Inside that function there is block of code that handles one-time initialization which ensures that a particular block of code is executed only once.
It consists of using function such as InitOnceBeginInitialize() in conjunction with InitOnceComplete(). To continue, the comparison after handleOneTimeInit() also fails, so essentially the whole function returns.
Basically, What happens here is that, physical RAM size can’t be retrieved because it is a virtual machine (through GetPhysicallyInstalledSystemMemory()) but functions that check if the RAM is eligible do actually pass. This leaves us at the point where we just return and RAM size check function becomes successful.
We can also make a simple program using the same technique to retrieve the amount of RAM physically installed using C++ as well:
1
2
3
4
5
6
7
8
9
10
11
12
#include <iostream>
#include <Windows.h>

int main()
{
	unsigned long long memorySize{};
	GetPhysicallyInstalledSystemMemory(&memorySize);

	std::cout << "Amount of RAM physically installed: " << memorySize << std::endl;

	return 0;
}
System Disk Size Check
Let’s now look at how system disk size is checked. First thing that get’s called is the memset() function.

We can see that RCX register is set to [rsp+70], EDX register is set to 0 (xor’ing register with itself results in 0), and R8D register is set to 0x208. This is the exact order of how arguments are used for function in x64.
Arguments for the memset() function go like so:
1
2
3
4
5
void *memset(
   void *dest,
   int c,
   size_t count
);
In assembly these refer to the following:
*dest- [rsp+70]c- xor edx, edx (0)count- 0x208
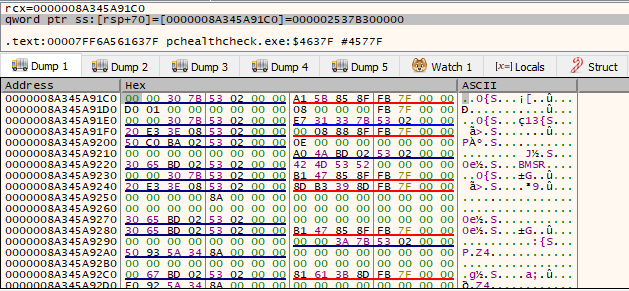
So our memset() function will set the buffer (at [rsp+70]) to 0 with the size of 0x208 (520 in decimal). This essentially prepares the buffer to be used as place to hold some information. We can see how the buffer looks like before the call.
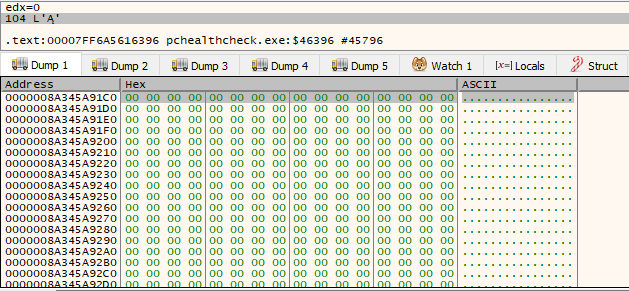
Once the function is called, area starting from 0x0000008A345A91C0 will set next 520 bytes to be 0. We can see how that happens after the function call is finished.
Once that is done, GetSystemWindowsDirectoryW() will be called. This function will retrieve the shared Windows directory on a multi-user system (https://learn.microsoft.com/en-us/windows/win32/api/sysinfoapi/nf-sysinfoapi-getsystemwindowsdirectoryw).
We can see that first argument it takes is the pointer to the buffer that was allocated and cleared by memset() function, and second argument is the size (0x104 = 260 dec).

We can see that after the function is called, the allocated space is now filled with the system Windows directory path. Additionally, the GetSystemWindowsDirectoryW() also returns the char size of the system path it retrieved.
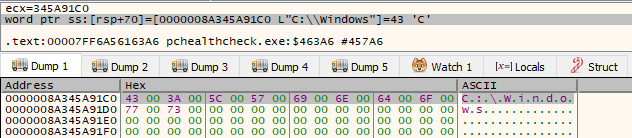
Next up, 2 bytes are moved from the buffer (C:) and placed at [rsp+60], and also EAX register which hold the char size of returned Windows path is compared to 0x103 (259 dec).

Our buffer now holds the following information:

The next instruction will jump over a larger amount of code only if the size of the returned windows system path is greater than 259 chars. In our case it is much less and we continue.
Next important function call is GetDiskFreeSpaceExW() which retrieves the amount of space that is available on a disk volume provided.

From Microsoft’s documentation we can see the following arguments which are necessary.

first arguments is our [rsp+60] which has the “C:” directory. second argument is 0 (xor edx, edx), third argument is location that will receive the total number of bytes on the disk that is available, and fourth argument is 0.
Once the function finishes we can see the amount of bytes we received in the [rsp+58]. The amount is 255B889000 in bytes.

Following up, we have an interesting operation. We take the amount of bytes we retrieved and shift the bits right by 14.

If we shift right the bits by 14 we end up with 255B8 (255B889000 >> 14 == 255B8). This ends up being 153.016 in decimal, which is exactly how much my VM has disk space.
In the next instruction, our shifted result is compared to D000 (53.248 decimal). Cool, so we can see that the requirement to have Windows 11 is 53.248 GB (back then atleast, now updates take much more I assume…).
Other checks in that function are just there to check if functions such as GetSystemWindowsDirectoryW() and GetDiskFreeSpaceExW() failed for some reason, and also an additional check if we don’t pass the disk size requirement.
Part 1 Conclusion
In the first segment of our reverse engineering series on the PC Health Check application, we explored the metohods for identifying key functions and the steps involved in deconstructing them. Additionally, we uncovered how Microsoft gathers data from our computers to assess compatibility through specific functions.
In the upcoming part, we will delve into the remaining functions, including Processor Cores Check, Secure Boot Check, Processor Family Check, TPM Check as well as a hidden mission chapter :D. Stay tuned for Part 2!